Starting July 2018, the HTTPS protocol has become an official (and quite mandatory) web standard, for what concerns best practices and data safety.
All websites that do not use an SSL certificate, hence having the “https”, in their url, will be marked as “not safe” by Google and other search engines might soon follow.
It is not a secret that websites that have been using the safer transfer protocol, have seen an increase in page ranking, therefore it has now becoming imperative that to maintain a website SEO, safety standards are also required.
Luckily, the move is quite simple.
Not everybody likes to use plugins for each and every small change to their website, so I will briefly show you how to move your WordPress site from HTTP to HTTPs in a few simple moves.
Keep in mind that the more plugins, the more potential safety issues and potential data breaches, but also the more server resources used each time a page is seen, hence possible worse performance – which also factors in a SEO strategy.
STEP 1
The first step, always before making any significant change to a website, is make a full backup of your site.
This means the whole of your website root, but most importantly your full WordPress database, the
wp-config.php
and
.htaccess
files and the whole of the
wp-content
folder.
STEP 2
The second step, is to get an SSL certificate, which is the actual encryption “engine” of a website.
The “HTTPS” simply signals browsers and users that an SSL is installed on the server, hence all data sent between the user and website, will be encrypted.
Now, your hosting provider surely offers SSL certificate and usually also installs it for you, so this could be your safest and easiest way to get one.
Some hosting providers offer free ones like Let’s Encrypt but many will have paid options.
If you are also thinking about changing server and are looking for a new hosting provider, I definitely recommend Media Temple managed VPS servers, if you need room to change and customize your server through shell access or Plesk Onyx.
If you want everything managed for you, including SSL certificate, caching, performance and more with no interest in shell access, then WP Engine is blazing fast and definitely a great choice (and you get 20% discount!).
Prices of SSL certificates vary greatly, but if you are on a tight budget and want to get one for free, you know how to install an SSL certificate on a server, or are willing to learn… don’t despair, you have at least 2 great free options to choose from.
Let’s Encrypt, a free, automated, and open Certificate Authority comes to the rescue and is endorsed and supported by the world’s biggest Internet companies, among others, in order to promote data safety worldwide.
If you have SSH access to your website, start here.
If you don’t have shell access, but your provider let’s you upload an external certificate, the you can follow this guide.
Another way to get a free account on CloudFlare!
This will not only get you much better performance and protection against attacks, but also a free SSL.
There is very little setup to do (mainly just change your domain’s NS) and no coding required.
However, make sure to read their SSL FAQ, in case you have doubts.
To check that your SSL is installed correctly (you might need to wait up to 24h), head over to these free online tools:
GeoCert SSL Installation Checker
DigiCert® SSL Installation Diagnostics Tool
Qualys SSL Server Test
DigiCert SSL Tools
Each tool gives you more details (and tools), so make sure that everything is good to know, before you proceed with the next steps.
STEP 3
The third step, is about telling WordPress to start using HTTPS everywhere!
So the first thing you need to do is turning your backend into a safer place, by adding this line to your
wp-config.php
:
define('FORCE_SSL_ADMIN', true);
The second one, is to add this to your
.htaccess
, which will redirect all your users automatically to HTTPS urls, instead of HTTPS (including search engines).
If you are using Apache:
<IfModule mod_rewrite.c>

RewriteEngine On

RewriteCond %{HTTPS} !=on

RewriteRule ^(.*)$ https://%{HTTP_HOST}%{REQUEST_URI} [L,R=301,NE]

Header always set Content-Security-Policy "upgrade-insecure-requests;"

</IfModule>
If you are using NGINX:
server {

listen 80;

server_name example.com www.example.com;

return 301 https://example.com$request_uri;

}
Great, now your website will now force HTTPS on every url!
This doesn’t just work for users, but also search engines, since we are using the 301 status code (which means “permanently moved”), making sure that they update their records for that page too.
STEP 4
It’s now time to get rid of mixed content warnings. You can see these, if you press F12 on Windows, to bring up your browser’s Dev Tools console.
In here you will see, besides Javascript errors and other information, also warning about your web pages using unsafe objects or images.
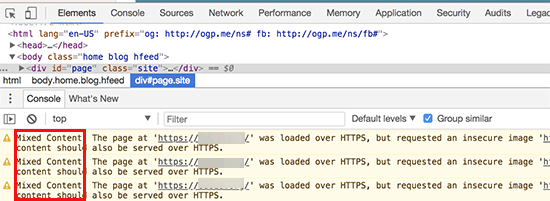
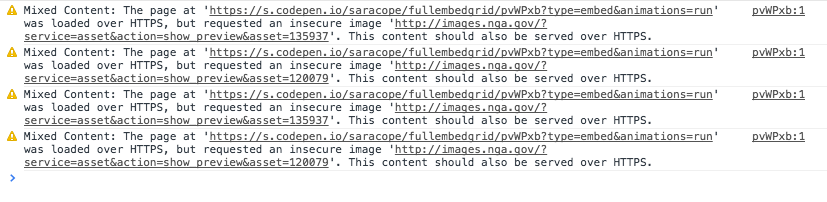
That is because, when you were adding content (eg. images) while still being on HTTP, the urls of these objects were saved as
http://www.yoursite/.../someimage.jpg
.
So your last task, is to make sure all these saved urls in your database and content, are converted to https urls.
Depending on how many objects you have saved with http urls (don’t forget to check also Custom Fields or hard-coded urls in your theme), this might take some time.
There are 2 ways to go about this:
1. The fastest, by using a convertion tool, which, however, will convert EVERY http url to https, even external ones)
2. The slower but more targeted way, which requires you to manually update the database (with certain queries)
You need to choose what best fits your website and your content: if you use a few images/upload material but many different external urls, the manual option is probably safest.
If you mostly just upload images and have few website references and they are usually just referencing websites homepages, the fast option should be safe enough (worst thing that can happen, a website you are linking to, in https now, will show a message to the user once they get there, that the website actually doesn’t have a SSL installed, which happens the more and more rarely nowadays).
In any case, make sure you have your database backup ready, in case you need to rollback and try something different.
OPTION 1
Head over to InterconnectIT and download their Search and Replace script.
This is THE best conversion script for WordPress databases available and that’s because it doesn’t just mindlessly convert, but also “reprogram” certain parts, if needed, so you won’t have to worry about data inconsistencies across your database.
Once done, create a new “sr” folder in your WordPress site root and upload in there all files and folders from the zip.
Then simply go to that folder, in your browser and “search replace” http:// with https:// in the 2 fields at the top.
Let it run and do its magic, you are done!
Make sure you delete that “sr” folder when done, to avoid the risk of the tool being used by someone with malicious intentions.
OPTION 2
Get on your website’s PHPMyAdmin (if you don’t know what this is, check your hosting provider panel) or install Adminer.
Execute this query on your MySQL:
UPDATE wp_posts
SET    post_content = ( Replace (post_content, 'http://', 'https://') )
WHERE  Instr(post_content, 'jpeg') > 0
OR Instr(post_content, 'jpg') > 0
OR Instr(post_content, 'gif') > 0
OR Instr(post_content, 'png') > 0;
This will convert all your images urls into https.
In case you have image urls in your custom fields, you can use this query:
UPDATE wp_postmeta
SET meta_value=(REPLACE (meta_value, 'src="http://','src="https://'));
In case you still see mixed content warnings, you might need to manually go in and fix them from your content itself, or by editing your theme files.
STEP 5
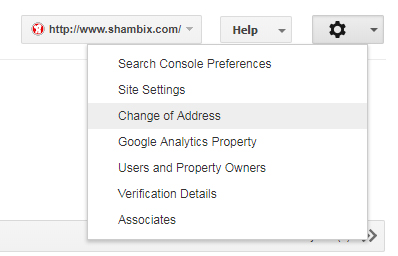
Google Webmaster tools considers http and https sites as two different things.
If you already have your site set up, using the http protocol, you need to add a new property with https this time.
Once done and verified, select your old http property and click on the cog icon on the right, then “Change of Address”.
Your new https should show up and after you select it, you will be able to request the change, keep all your old data and notice an improvement in page ranking.
You are all done!