GSuite is probably the best platform to manage your business email, calendars and Team GDrives as well all the Google APIs, but it doesn’t secure your emails by default, unless your domain is provided directly by Google, so it’s really important that you follow these few steps, to avoid that you email suddenly becomes the Spam sending Central for any hacker or in case your email has already be compromised and you are at your wits’ end.
This is 6-Step best practice guide to secure your Google GSuite email.
Always best to be safe than sorry, so I really advice anyone with emails with GSuite to follow these steps, regardless you have been hacked already or not.
This applies to GSuite Gmails, not simple @gmail.com emails.
It takes a moment to compromise your Gmail account if your password is ever exposed (business emails should never be used to sign up or login to anything besides Gmail, not even through Google Sign-in popups), not for Facebook accounts or Instagram, not for literally any service or website.
I know you do anyway, but hey, you’ve been warned.
Always have burn email, that you can use to sign up to services and websites, with a different password than your business Gmail and social media accounts.
Once a hacker gets your GSuite Gmail password, they’ll be able to permanently connect to it, read it and use it, EVEN if you change passwords 1000 times.
It goes without saying that 2-Factor Authentication (2FA) is currently the best method to secure an email or account, but since it works through the use of an additional code-generating app (eg. Authenticator), which lives on your smartphone usually, should anything happen to it (eg. lost, broken, reset phone) and/or you lose your recovery codes, retrieving your account will be HELL, if you ever even get it back.
So how to secure an email from malicious third-party use?
We need to do a few things on your GSuite dashboard and on your domain provider’s DNS dashboard (eg. GoDaddy or NameCheap).
You don’t need any technical knowledge for this, it’s a really straightforward and quick process.
Keep in mind one thing though: STEP 1 will work with any GSuite account (even the free legacy ones), but the other steps will only work on the paid GSuite plans.
STEP 1
Log into your GSuite admin dashboard and head over to Apps -> GSuite -> Gmail -> Safety.
Turn all the Safety options on, but I suggest you set them to display a warning, rather than bouncing them, because some valid emails may be rejected.
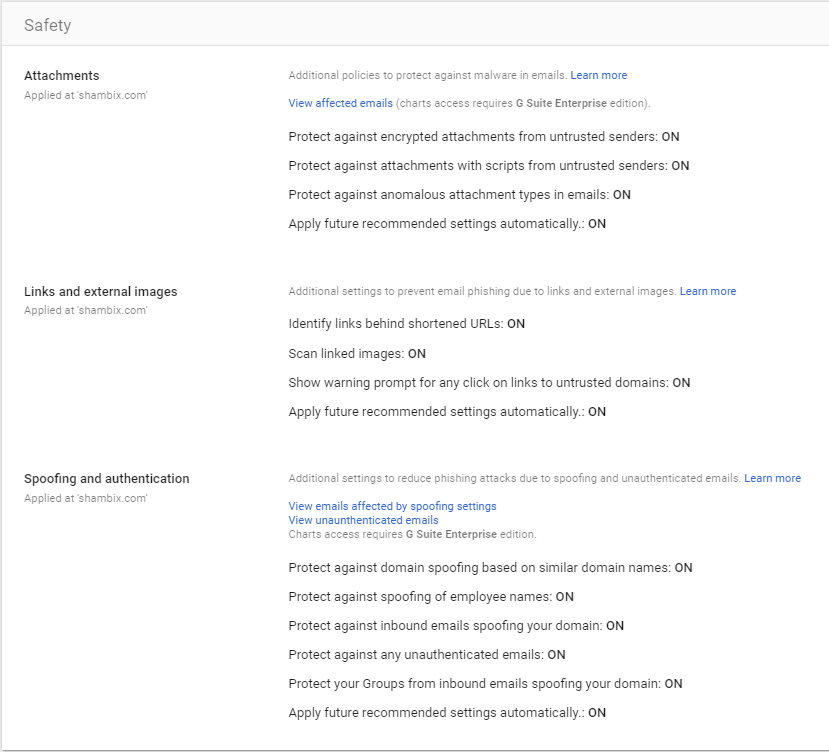
Save and exit the Safety block, but stay within the Gmail options.
STEP 2
While still in the Gmail options, click on the Authenticate Emails (DKIM) block.
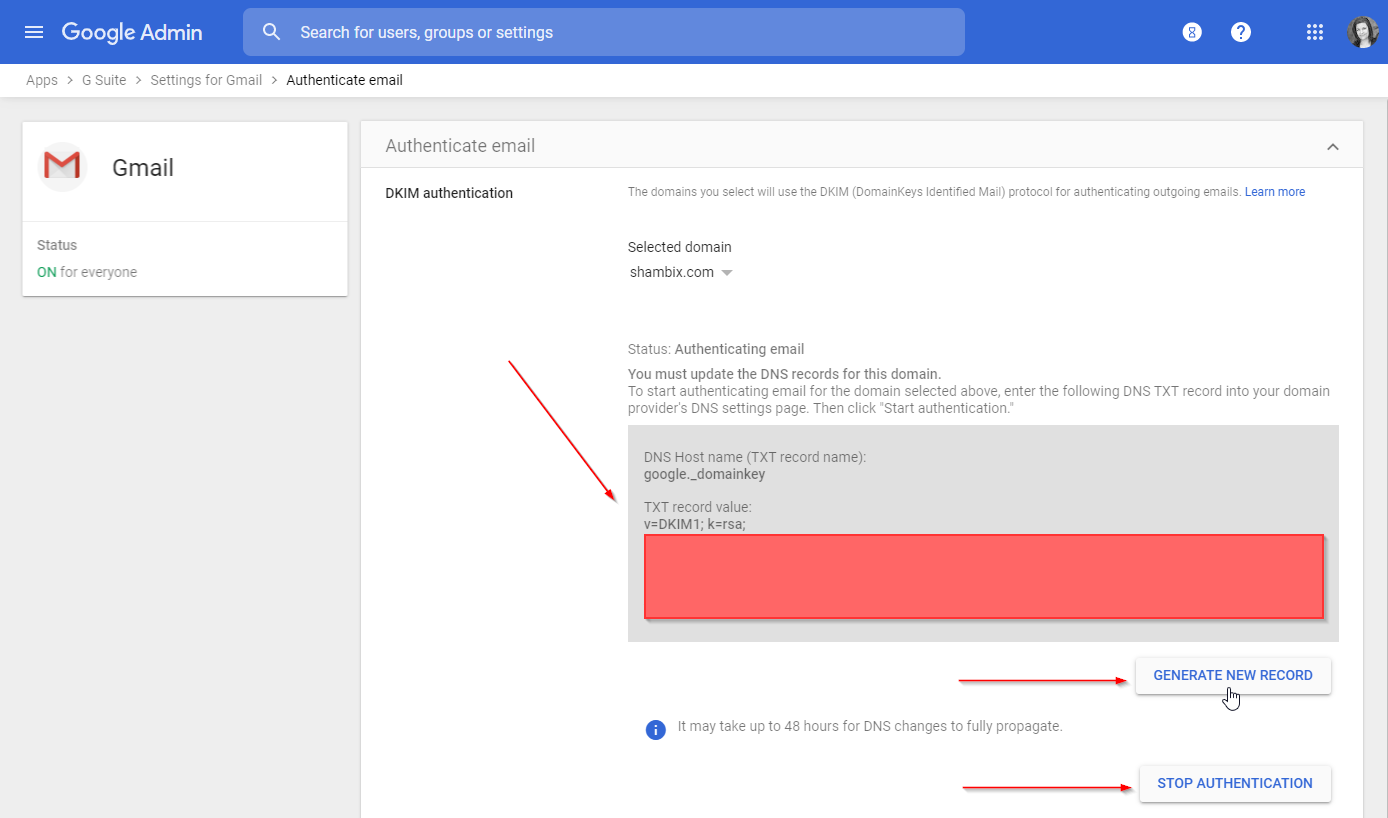
Hit the Generate New record a couple of times and keep the page open.
You now have a DNS record, ready to be added as a TXT DNS, in your domain’s provider domain DNS settings.
In the new TXT DNS, set the TXT host as google._domainkey and the value to what you see in your GSuite, as TXT record value.
eg.
v=DKIM1; k=rsa; p=MIIBIjANBgkqhkiGGMhNe2knCkeGr6F3D3oCIu0Sz4Ctdl0VOo5FoWMP8GV+cMBiZYG429QMKtBTNT+kVsZDH9Tu9k8eJX834OZWZyPzISCNhpC81qkOzQtRuK7195cvVkHgJx4/KhRQqdXBI+ldIiiH6HEaT3RNDz5unsX/S8WrbBedCuMOAzIL2JwIDAQAB
Save the DNS record, don’t close the page yet and on head back to the GSuite page, where you will now hit Start Authentication.
STEP 3
We will now add 2 more TXT DNSs to your domain.
The first one will have as host either @ or yourdomain.com (not all providers allow the use of @, so the domain alone is fine too).
As value, add v=spf1 include:_spf.google.com ~all
Save it.
STEP 4
The last TXT DNS that we need to add, so that your emails are safe has _dmarc as host and value v=DMARC1; p=reject; rua=mailto:youremail@yourdomain.com, dmarc@yourdomain.com where youremail@yourdomain.com is your actual email (the dmarc@ email can’t stay as is even if it doesn’t exist, just replace the domain with your own).
Save the record and close your domain DNS dashboard.
This way, if someone was using your email as sending method for SPAM, they won’t be able to anymore, ever again.
STEP 5
Just to be sure no one is already listening in our emails, we need to end any open session that might be using your email (including your own), so you will now head to your GSuite dashboard -> Users -> Your Email.
Scroll through the blocks and click on the Security section, a new page will open.
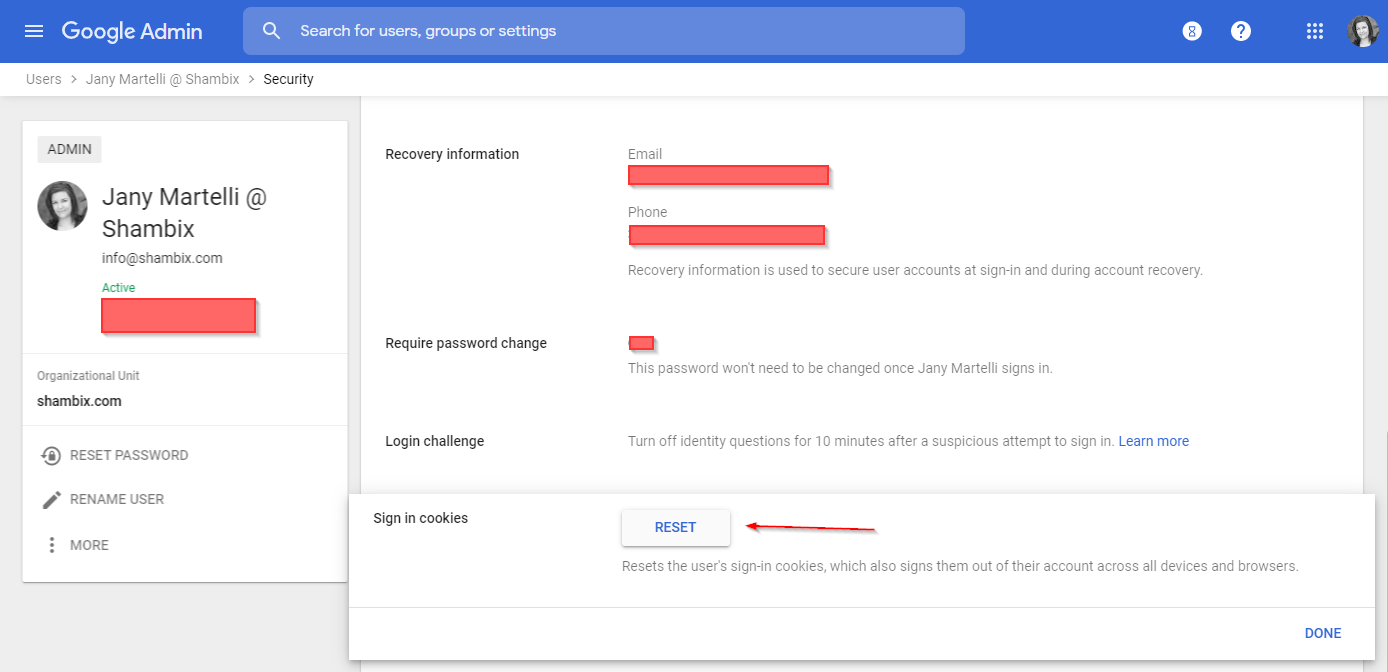
Search for the Sign in cookies part and click on it.
Hit the Reset button (and be instantly logged out from your email, on any device).
STEP 6
Let’s now re-login into your GSuite dashboard and go back to our User email.
Change password and make it a hard one, one that you will not use for anything else, ever.
Also, don’t send the new password via email to yourself, copy and paste it somewhere safe, possibly offline.
Log back in to your email, using the new password, on all your devices.
Your email is now safe!
If you notice that you are not getting some legitimate emails, my advice is to contact the GSuite support right away (if you’re on a paid plan), they will be able to tell you exactly what to do in that case.